

This tutorial should help you to get started with Helm Operations, referred to as HelmOps and CI/CD with Tekton on K3s running on your Laptop deployed on multipass Ubuntu VMs with MetalLB support. We’ll use Chartmuseum to store a simple Helm Chart in our own Helm Repository in Chartmuseum and deploy our apps from there through Tekton Pipelines in the next section of this tutorial.
This guide should work with any K8s implementation running locally or on any cloud with some minor adaptations to the scripts provided in the Github Repo of Bonsai.
To learn more about K3s and our somehow opinionated Bonsai implementation on Multipass VMs with MetalLB support, please refer to this article about K3s with MetalLB on Multipass VMs.
Get started
With the following commands you should get a K3s cluster running on your machine in about 3 minutes on real Ubuntu VMs, which we refer sometimes as a near-to-production environment.
git clone https://github.com/kubernauts/bonsai.git
cd bonsai
./deploy-bonsai.sh
# please accept all default values (1 master and 2 workers)
Deploy Chartmuseum
Prerequisites
- A running k8s cluster
- LB service (it will be installed by default with Bonsai)
- helm3 version
We deploy chartmuseum with custom values and create an ingress with the chartmuseum.local domain name.
Please set the following host entries in your /etc/hosts file:
# please adapt the IP below with the external IP of the traefik LB (run `kubectl get svc -A` and find the external IP)
192.168.64.26 chart-example.local
192.168.64.26 chartmuseum.local
192.168.64.26 tekton-dashboard.local
192.168.64.26 registry-ui.local
192.168.64.26 getting-started-triggers.local
And deploy chartmuseum:
cd addons/chartmuseum
helm repo add stable https://kubernetes-charts.storage.googleapis.com
kubectl create ns chartmuseum
kubectl config set-context --current --namespace chartmuseum
helm install chartmuseum stable/chartmuseum --values custom-values.yaml
kubectl apply -f ingress.yaml
Now you should be able to access chartmuseum through:
If you see the “Welcome to ChartMuseum!”, then you’re fine.
Now we are ready to add the chartmuseum repo and install the helm-push plugin and package the sample hello-helm chart and push it to our chartmuseum repo running on K3s:
# add the repo
helm repo add chartmuseum http://chartmuseum.local
# install helm push plugin:
helm plugin install https://github.com/chartmuseum/helm-push.git
# build the package:
cd hello-helm/chart
helm package hello/
# the helm package name will be hello-1.tgz
ls -l hello-1.tgz
# push the package to chartmuseum
helm push hello-1.tgz chartmuseum
# You should get:
Pushing hello-1.tgz to chartmuseum…
Done.
Install the Chart
To install a chart, this is the basic command used:
helm install <chartmuseum-repo-name>/<chart-name> --name <release-name> (helm2)
helm install <release-name> <chartmuseum-repo-name>/<chart-name> (helm3)
We need to update our helm repos first and install the chart:
helm repo update
helm install hello chartmuseum/hello
We should get a similar output like this:
NAME: hello
LAST DEPLOYED: Sat Jul 25 17:56:23 2020
NAMESPACE: chartmuseum
STATUS: deployed
REVISION: 1
TEST SUITE: None
Harvest your work
curl http://chart-example.local/
Welcome to Hello Chartmuseum for Private Helm Repos on K3s Bonsai!
What happened here?
We deployed the chart with helm through the command line, the hello service was defined in the values.yaml with the type LoadBalancer and received an external IP from MetalLB.

In the above values.yaml we define to have an ingress and the hostname which is chart-example.local as the domain name which is mapped in our /etc/hosts file to the IP address of the traefik load balancer, alternatively we could map the domain to the external IP address of the hello-hello service (in my case 192.168.64.27) as well.
Delete the chart and the helm hello release
Since we want to automate the deployment process in the next section with Tekton Pipelines and do the CI part as well, we’ll clean up the deployment and delete our chart from chartmuseum.
helm delete hello
curl -i -X DELETE http://chartmuseum.local/api/charts/hello/1
CI/CD and HelmOps on Kubernetes
In this section, we’re going to introduce Tekton and Tekton Pipelines which is the technological successor to Knative Build and provides a Kube-Native style for declaring CI/CD pipelines on Kubernetes. Tekton supports many advanced CI/CD patterns, including rolling, blue/green, and canary deployment. To learn more about Tekton, please refer to the official documentation page of Tekton and also visit the new neutral home for the next generation of continuous delivery collaboration by Continuous Delivery Foundation (CDF).
For the impatient
Katakoda provides a very nice Scenario for Tekton which demonstrates building, deploying, and running a Node.js application with Tekton on Kubernetes using a private docker registry.
By going through the Katakoda scenario in about 20 minutes, you should be able to learn about Tekton concepts and how to define various Tekton resources like Tasks, Resources and Pipelines to kick off a process through PipelineRuns to deploy our apps in a GitOps style manner on Kubernetes.
In this section, we’re going to extend that scenario with Chartmuseum from the first section and provide some insights about Tekton Triggers which rounds up this tutorial and hopefully helps you to use it for your daily projects.
About GitOps and xOps
GitOps is buzzing these days after the dust around DevOps, DevSecOps, NoOps, or xOps has settled down. We asked the community about the future of xOps and what’s coming next, if you’d like to provide your feedback, we’d love to have it:
The reality is we did CVS- and SVN- Ops about 15 years ago with CruiseControl for both CI and CD. Later Hudson from the awesome folks at Sun Micorsystems was born and renamed to Jenkins, which is still one of the most widely used CI/CD tools today.
Times have changed and with the rise of Cloud Computing, Kubernetes and the still buzzing term Cloud-Native, which is a new way of thinking, the whole community is bringing new innovations at the speed of light.
Cloud Native: A New Way Of Thinking!
New terms like Kube-Native-Ops, AppsOps, InfraOps and now HelmOps are not so common or buzzing yet at this time of writing. We believe that Tekton or Jenkins-X which is based on Tekton along with other nice solutions like ArgoCD, FluxCD, Spinnaker or Screwdriver are going to change the way we’re going to automate the delivery and roll-out of our apps and services the Kube-Native way on Kubernetes.
With that said, let’s start with xOps and deploy our private docker registry and Tekton on K3s and run our simple node.js app from the previous section through helm triggered by Tekton Pipelines from Tekton Dashboard.
Make sure you have helm3 version in place, add the stable and incubator Kubernetes Charts Helm Repo and install the docker registry proxy, the registry UI and the ingress for the registry UI:
helm version --short
helm repo add stable https://kubernetes-charts.storage.googleapis.com
helm repo add incubator http://storage.googleapis.com/kubernetes-charts-incubator
helm upgrade --install private-docker-registry stable/docker-registry --namespace kube-system
helm upgrade --install registry-proxy incubator/kube-registry-proxy \
--set registry.host=private-docker-registry.kube-system \
--set registry.port=5000 \
--set hostPort=5000 \
--namespace kube-system
kubectl apply -f docker-registry-ui.yaml
kubectl apply -f ingress-docker-registry-ui.yaml
Access the Docker Registry
Deploy Tekton Resources, Triggers and Dashboard
kubectl apply -f pipeline-release.yaml
kubectl apply -f triggers-release.yaml
kubectl config set-context --current --namespace tekton-pipelines
kubectl apply -f tekton-dashboard-release.yaml
kubectl apply -f ingress-tekton-dashboard.yaml
Access the Tekton Dashboard
The Tekton dashboard for this installation on K3s can be reached via
http://tekton-dashboard.local/
The dashboard is great to see how tasks and PipelineRuns are running or if something goes wrong to get the logs for troubleshooting or sell it as your xOps Dashboard ;-)
For now we don’t have any pipelines running. We’re going to run some tasks first, build a pipeline and initiate it in the next steps along with pipeline runs. But before we fire the next commands, I’d like to explain what we’re going to do.
We have 2 apps, the first app is named app, which builds an image from the source on github with kaniko executor and pushes ist to our private docker registry and deploy it from there into the hello namespace, where we deploy our hello app from our private chartmuseum repo for the HelmOps showcase as well.
N.B.: we cleaned-up the same hello app at the end of the first section of this tutorial and are going to deploy it through HelmOps.
Take it easy or not, we’re going to create a task, build a pipeline containing our task, use the TaskRun resource to instantiate and execute a Task outside of the Pipeline and use the PipelineRun to instantiate and run the Pipeline containing our Tasks, oh my God? ;-)
Take it easy, let’s start with HelmOps or xOps
You need the tkn cli to follow the next steps, I’m using the latest version at this time of writing.
➜ pipeline git:(master) ✗ tkn version
Client version: 0.11.0
Pipeline version: v0.15.0
Triggers version: v0.7.0
We create a namespace named hello and switch to the namespace:
kubectl create ns hello
kubectl config set-context --current --namespace hello
Now we need to define the git-resource, which is the source in our git repo defined through a custom resource definition PipelineResource:
And apply the git-resource:
kubectl apply -f node-js-tekton/pipeline/git-resource.yaml
With that we are defining where our source is coming from in git, in our case from Github.
We can now list our first resource with the tkn cli tool as follow:
tkn resources list
In the next step, we’re going to define a task named “build-image-from-source”. In the spec part of the Task object (CRD) we define the git-source with the type git and some parameters as pathToContext, patToDockerfile, imageUrl and imageTag as inputs and the steps needed to run the task, the list-src (which is optional) and the build-and-push step which uses the kanico-project executor image with the command /kaniko/executor/ and some args to build and push the image.
Now we need to deploy our task build and push Task resource to our cluster with:
kubectl apply -f node-js-tekton/pipeline/task-build-src.yaml
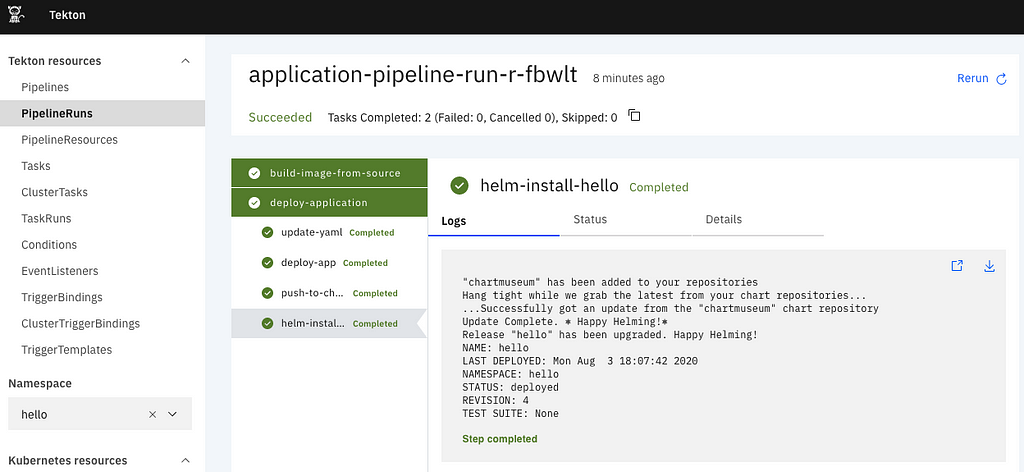
And deploy another Task which is defined in the task-deploy.yaml
This Task has 4 steps:
- update-yaml # set the image tag
- deploy-app # deploy the first app
- push-to-chartmuseum # push the hello helm chart to chartmuseum
- helm-install-hello # install the helm chart to the cluster
The last 3 tasks are using a slightly extended helm-kubectl image which has the helm push plugin installed.
N.B. the Dockerfile for helm-kubectl is provided under addons/helm-kubectl.
We can now list our tasks with:
tkn tasks list
And finally we’ll declare the pipeline and run it with the pipeline-run entity.
Nice to know: In PipelineRun we define a collection of resources that define the elements of our Pipeline which include tasks.
kubectl apply -f node-js-tekton/pipeline/pipeline.yaml
tkn pipelines list
kubectl apply -f node-js-tekton/pipeline/service-account.yaml
kubectl get ServiceAccounts
kubectl apply -f node-js-tekton/pipeline/pipeline-run.yaml
tkn pipelineruns list
tkn pipelineruns describe application-pipeline-run
kubectl get all -n hello
curl chart-example.local
Welcome to Hello Chartmuseum for Private Helm Repos on K3s Bonsai!
Harvest your Helm-X-Ops work
If all steps worked, in the Tekton Dashboard you should get what you did in the hello namespace, enjoy :-)
What’s coming next: Automation
In the third section of this tutorial, we’ll see how to use Tekton Triggers to automate our HelmOps process, stay tuned.
Related resources
Sample nodes-js app for tekton
https://github.com/javajon/node-js-tekton
Tekton Pipelines on Github
https://github.com/tektoncd/pipeline
Katacoda Scenarions
https://www.katacoda.com/javajon/courses/kubernetes-pipelines/tekton
https://katacoda.com/ncskier/scenarios/tekton-dashboard
Tekton Pipelines Tutorial
https://github.com/tektoncd/pipeline/blob/master/docs/tutorial.md
Open-Toolchain Tekton Catalog
GitOps
Building a ChatOps Bot With Tekton
Building a ChatOps Bot With Tekton
Hello HelmOps with Tekton and Chartmuseum on Kubernetes was originally published in Kubernauts on Medium, where people are continuing the conversation by highlighting and responding to this story.
Mehr zu Kubernetes Services, Kubernetes Training und Rancher dedicated as a Service lesen unter https://blog.kubernauts.io/hello-helmops-with-tekton-and-chartmuseum-on-kubernetes-4ffd2038425d?source=rss----d831ce817894---4
Neueste Kommentare